Whether it’s the aftermath of a laundry mishap, a bit of shrinkage, or you’ve simply outgrown your favorite sweatshirt, there’s no need to bid farewell to comfort. As a beginner or intermediate sewer, you have a range of options to loosen the waistband of your beloved sweatshirt and restore it to its cozy glory. In this comprehensive guide, we’ll explore multiple techniques, starting from the simplest solutions and gradually progressing to more complex sewing methods.
Evaluate the Situation
Before diving into the sewing world, take a moment to evaluate why your sweatshirt’s waistband feels tight. Is it a matter of recent shrinkage, or have your dimensions changed? Understanding the root cause will guide you in choosing the most suitable solution.
As we delve into the realm of modifying sweatshirt waistbands, we encounter a range of solutions that cater to different skill levels, from beginner to intermediate. These techniques offer a spectrum of possibilities, allowing you to choose the method that aligns with your sewing proficiency and desired outcome. Let’s explore options two through six, each presenting a unique approach to alleviate the tightness in your sweatshirt’s waistband. Whether you’re looking for simplicity or a more intricate sewing adventure, there’s a solution here for every sewing enthusiast.
Skill Level: Beginner
Embarking on your sewing journey to loosen a sweatshirt waistband is an exciting adventure. As a beginner, you’ll find that simplicity and effectiveness are key. Let’s explore two accessible options that require basic sewing skills and a dash of creativity. These beginner-friendly techniques provide a gentle introduction to the world of garment alteration, ensuring that you achieve the perfect fit for your beloved sweatshirt without feeling overwhelmed.
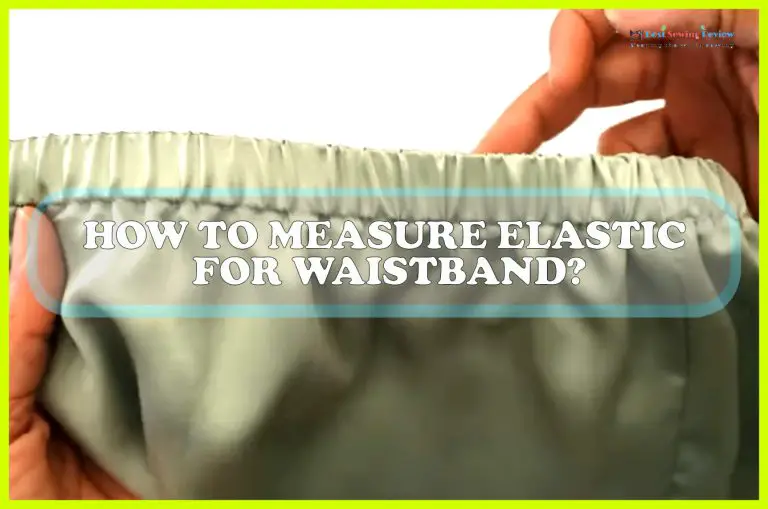
Stretch the Elastic:
Stretching the existing elastic is one of the simplest ways to achieve a more comfortable fit. If you’re new to sewing but eager to customize your sweatshirt’s fit, stretching the existing elastic is a fantastic starting point. This straightforward technique requires minimal tools and provides a quick solution to your snug waistband dilemma.
- Identify the Elastic Band: Locate the elastic band within the waistband. It’s typically a narrow strip of elastic sewn into a casing.
- Gently Stretch the Elastic: Using your hands, gently pull and stretch the elastic along the waistband. Focus on areas where tightness is most noticeable.
- Repeat as Needed: Continue stretching and manipulating the fabric until you achieve the desired level of looseness.
- Air Dry: Allow the sweatshirt to air-dry while maintaining the stretched position. This helps set the fabric in its new shape.
Skill Level: Intermediate
As an intermediate sewer, you’ve gained some confidence with a needle and thread, and now it’s time to delve into slightly more complex methods. These options offer a bit more customization and creative flair while remaining manageable for those with a moderate level of sewing expertise. Let’s explore options three through six, introducing you to techniques that strike a balance between accessibility and a more refined sewing experience.
Insert a Drawstring:
Adding a drawstring can be an easy and stylish solution to adjust the waistband.
- Choose a Drawstring: Select a drawstring that complements your sweatshirt’s style. You can opt for a matching or contrasting color depending on your preference.
- Create Openings: Using small scissors or a seam ripper, carefully create small openings on either side of the front of the sweatshirt near the waistband.
- Thread the Drawstring: Insert the drawstring through the openings, using a safety pin to guide it through. Make sure both ends of the drawstring are even.
- Tie a Knot: Tie a secure knot at each end of the drawstring, ensuring it doesn’t get lost within the casing.
- Adjust as Needed: Loosen or tighten the drawstring to achieve the desired fit. This option provides both functionality and a decorative touch.
Extend the Elastic
If stretching alone doesn’t suffice, consider extending the existing elastic for a more customized fit.
- Cut Openings: Create small openings on either side of the sweatshirt near the waistband, similar to the drawstring method.
- Measure and Cut New Elastic: Measure the length of the existing elastic and cut a new piece to the desired length. Ensure it’s slightly longer to allow for a comfortable fit.
- Attach the New Elastic: Thread the new elastic through the openings and sew the ends securely. Ensure the tension is distributed evenly.
- Close Openings: Once the new elastic is in place, sew the openings shut to create a seamless finish.
Replace the Elastic
If you’re comfortable with more intricate sewing, replacing the elastic entirely is an effective way to customize the fit.
- Remove Old Elastic: Carefully remove the existing elastic from the waistband, using a seam ripper or small scissors.
- Measure and Cut New Elastic: Measure your waist or the desired fit and cut a new piece of elastic accordingly.
- Sew the New Elastic: Sew the new elastic into the waistband, ensuring it’s evenly distributed. Use a zigzag stitch for flexibility.
- Close the Casing: Once the new elastic is securely in place, close the casing by sewing along the waistband seam.
- Adjust Tension: Test the fit and adjust the tension as needed before completing the final stitching.
Create a Side Panel Insert
For a more elaborate solution that enhances both fit and style, consider adding side panels.
- Cut Side Panels: Measure and cut fabric panels in a complementary or contrasting color. These panels will be inserted on each side of the sweatshirt.
- Attach Side Panels: Sew the side panels onto the existing sweatshirt, ensuring they align seamlessly with the waistband.
- Adjust Fit: The added fabric provides extra room and a stylish touch. Adjust the size of the panels to achieve the desired fit.
- Finish Seams: Use a serger or a zigzag stitch to finish the seams, preventing fraying and ensuring durability.
Skill Level: Expert
These expert-level options allow seasoned seamstresses and tailors to showcase their craftsmanship while solving the issue of a tight sweatshirt waistband with finesse and creativity. Choose the method that aligns with your expertise, and enjoy the process of transforming your garment into a personalized masterpiece.
Redesign with a Peplum Addition:
For an advanced and fashion-forward solution, consider incorporating a peplum-style addition to your sweatshirt. This involves creating a gathered or flared fabric extension at the waist, adding both elegance and roominess.
- Measure and Cut Fabric: Measure the circumference of your sweatshirt at the waist and cut a rectangular piece of fabric accordingly. The length of the fabric will determine the depth of the peplum.
- Gather or Pleat: Create gathers or pleats along one edge of the fabric, adjusting the fullness to your liking. This gathered edge will be attached to the existing waistband.
- Attach the Peplum: Sew the gathered edge of the fabric to the waistband, ensuring an even distribution of gathers. This addition not only provides extra room but also introduces a stylish and sophisticated element to your sweatshirt.
- Finish Seams: Employ your expertise to finish seams professionally, ensuring durability and a polished appearance.
Inset a Hidden Elastic Waistband:
Elevate your sweatshirt modification with a hidden elastic waistband, offering a discreet yet effective way to adjust fit.
- Determine Waistband Placement: Decide where you want the new waistband to sit – it could be slightly above or below the existing waistband.
- Create Casing: Cut a strip of fabric to serve as the casing for the hidden elastic. Attach it to the sweatshirt, leaving a small opening to insert the elastic.
- Insert Elastic: Measure and cut elastic to your preferred length. Using a safety pin, thread the elastic through the casing until it reaches the other end.
- Secure Elastic: Sew the ends of the elastic together securely, ensuring a snug fit without causing discomfort.
- Close Casing: Sew the opening of the casing shut, concealing the elastic. This method provides a sophisticated solution for adjusting the waistband without altering the sweatshirt’s overall aesthetic.
- Refine the Finish: Employ advanced finishing techniques to achieve a polished result, showcasing your mastery of tailoring skills.
Conclusion
Loosening the waistband of your sweatshirt is a manageable task for beginner to intermediate sewers. Start with the simpler options like stretching the elastic or adding a drawstring, and gradually progress to more complex techniques like extending or replacing the elastic or creating side panel inserts. Each method offers a unique blend of functionality and style, allowing you to tailor your sweatshirt to your preferences. Experiment with these techniques, embrace the sewing journey, and relish the comfort of your favorite sweatshirt with a personalized and perfect fit. Happy sewing!
Frequently Asked Questions
How to Cut the Waistband of a Sweatshirt
- Lay the sweatshirt flat on a cutting surface. If the sweatshirt has a design, make sure it is positioned how you want it before cutting.
- Measure and mark where you want to cut the waistband off with chalk or a fabric pencil. It is helpful to try the sweatshirt on before doing this so you can get an accurate measurement.
- Cut along the chalk line with sharp scissors. Be extra careful not to accidentally cut into the rest of the fabric while cutting through the waistband.
- Remove any excess fabric or threads from around the raw edge of the newly cut neckline.
How Do You Make a Tight Sweatshirt Lose?
The easiest way to make a tight sweatshirt loose is to simply cut off the bottom band. This will allow the fabric to hang more loosely on your body and won’t be as constricting. You can also try stretching out the fabric by putting the sweatshirt in a hot dryer for a few minutes.
How Do You Loosen a Waistband?
Assuming you would like tips on how to loosen a waistband: There are a few ways you can loosen a waistband. One way is to use a seam ripper or small scissors to carefully cut the thread that is holding the band in place.
Another way is to gently pull on the band until it pops off. If the band is too tight, you may need to use a knife or other sharp object to carefully cut it off.
How Do You Stretch Out the Elastic Band on Sweatshirts?
If your sweatshirt has an elastic band at the bottom, you may find that it gets loose over time and needs to be stretched out. Here’s how to do it:
- Wet the elastic band with warm water. This will help to loosen it up.
- Place the band over your knee or on a hard surface, and pull it until it’s taut.
- Hold the position for 30 seconds or so, then release.
Repeat this process a few times until the elastic band feels more relaxed.
How Do You Loosen a Sweater Waist?
There are a few ways to loosen a sweater’s waist and each method depends on the type of sweater and the severity of the problem. If your sweater is made of wool, you can try soaking it in lukewarm water for about 30 minutes. This will help to relax the fibers and make the fabric more pliable.
You can also try using a steamer on the wool sweater, being careful not to hold it too close to the fabric as this can cause damage. If your sweater is made of cotton or another synthetic fiber, you may be able to gently stretch it out by hand. Start at the center of the waistband and work your way outwards, being careful not to pull too hard or you could tear the fabric.
Another option is to put the sweater in a garment bag and hang it in your bathroom while you take a hot shower; steam will help to loosen up tight fibers.
How to Cut the Bottom of a Sweatshirt
There are a few different ways that you can cut the bottom of a sweatshirt, depending on the look you’re going for. If you want to keep it simple, you can cut it straight across the bottom hem. Or, if you want to add some shape to your sweatshirt, you can cut it into a V-shape or scalloped edge.
Here’s a step-by-step guide to cutting the bottom of a sweatshirt:
- Start by laying your sweatshirt flat on a surface. Use a ruler or measuring tape to mark out where you want to make your cuts.
- For a straight-across cut, simply use scissors to cut along the line you’ve marked.
- For a V-shaped or scalloped edge, start by cutting small slits along the line you’ve marked. Then, use scissors to make curved cuts between each slit – this will create the V-shape or scalloped effect.
- Once you’re happy with your cuts, try on your sweatshirt to see how it looks! If necessary, trim off any stray threads or pieces of fabric.
How Do You Make the Bottom of a Sweatshirt Bigger?
There are a few ways to make the bottom of a sweatshirt bigger. One way is to cut the bottom hem off and then sew on a piece of fabric that is wider. Another way is to cut the side seams of the sweatshirt and then insert a piece of fabric in between.
How Do You Loosen the Elastic on the Bottom of a Sweatshirt?
If you find yourself in a situation where you need to loosen the elastic on the bottom of a sweatshirt, there are a few things you can do. The first is to try stretching the fabric outwards. This will usually cause the elastic to loosen up enough that it’s not as snug against your body.
Another option is to use a safety pin to loosen the elastic. Simply insert the safety pin into the fabric and then pull on the loose end of the elastic until it’s loosened to your desired level. Finally, if all else fails, you can always cut the elastic completely off and replace it with new Elastic that’s longer or shorter, depending on how much looser you want your sweatshirt to be.
How Do You Loosen the Bottom of a Sweater?
One way to loosen the bottom of a sweater is to put it on inside out and then stretch it down over your hips. Another way is to lay the sweater flat and then use your hands to gently pull and stretch the fabric downwards. You can also use a steamer or iron on a low heat setting to loosen the fabric even further if you need to.
Can I Stretch Out My Sweatshirt?
Yes, you can stretch out your sweatshirt. Here are a few ways to do it: 1. Wear it for a little while.
The heat from your body will help to loosen up the fabric and make it more pliable. 2. Put it in the dryer on low heat for 10-15 minutes. This will also help to loosen up the fabric fibers and make stretching easier.
3. Use your hands to gently pull and stretch the fabric in different directions. Start with small stretches and then gradually increase the amount of force you’re using. Remember to be gentle so you don’t rip or tear the fabric.
4. Hang it up or lay it flat to dry after stretching it out. This will help maintain its new shape once you’ve finally achieved the desired level of stretchiness!